Making shiny rocks from man-made crystals
Well, it's been a year of horrors on many fronts and next year will likely be little different. So, as a bit of a reminder and a bit of a request – please take joy where you can and spread joy where you can. We'll meet again in 2026!
Also, this post is a bit long and has a bunch of photos, if the post cuts off due to delivery issues, check out the post on the website.
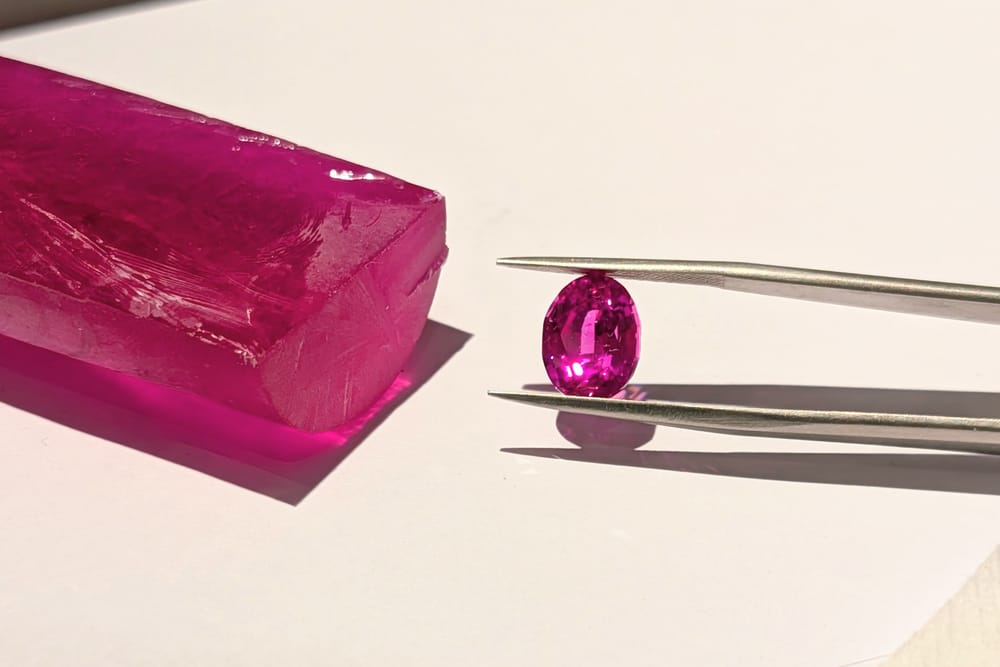
It's the end of 2025 and for fun we're going to fly completely off the data rails and indulge in a bit of hobby work. I've had a couple of weird projects ongoing during my long break. Before the holiday season, a colleague had been asking me about a gemstone they had gotten but wasn't satisfied with. It was supposedly an oval cut ruby, but since it was a low grade stone, it had been cut out of very hazy, occluded material. You could barely see light through it. It was technically a proper ruby mined from the earth, but it's not considered pretty unless you're a rock nerd that appreciates that sort of thing. A perfectly clear natural stone of similar size (roughly 10mm x 8mm) would probably run anywhere from $5000 to $50,000 on the open market depending on quality parameters, and my colleague most definitely didn't pay anywhere near even the low end of the price.
Since I haven't had chance to use my gem cutting machine since moving, and I had a some synthetic ruby material around, I decided to see if I could produce a similar stone. I hadn't cut an oval design before, let alone one to specified dimensions, so it would be a good learning experience. Ovals have much fewer reference points than perfectly round or square stones, which ramps up the skill bar.
While I was working off and on, I took lots of pictures on my phone. So, here's a rundown of how a chunk of inexpensive crystal gets turned onto a much more expensive shiny rock.
Equipment
First, gem faceting takes specialized equipment. You can do it on really primitive gear (that's what people did for centuries) but modern tools make it much easier. I got my machine during the COVID-19 lockdowns from a company in Sri Lanka for somewhere in the ballpark of $2600 shipped to my door, which is pretty cheap for a machine that's actually used in cutting houses in Southeast Asia. Current prices have probably gone up somewhat due to generalized inflation (and import duties).
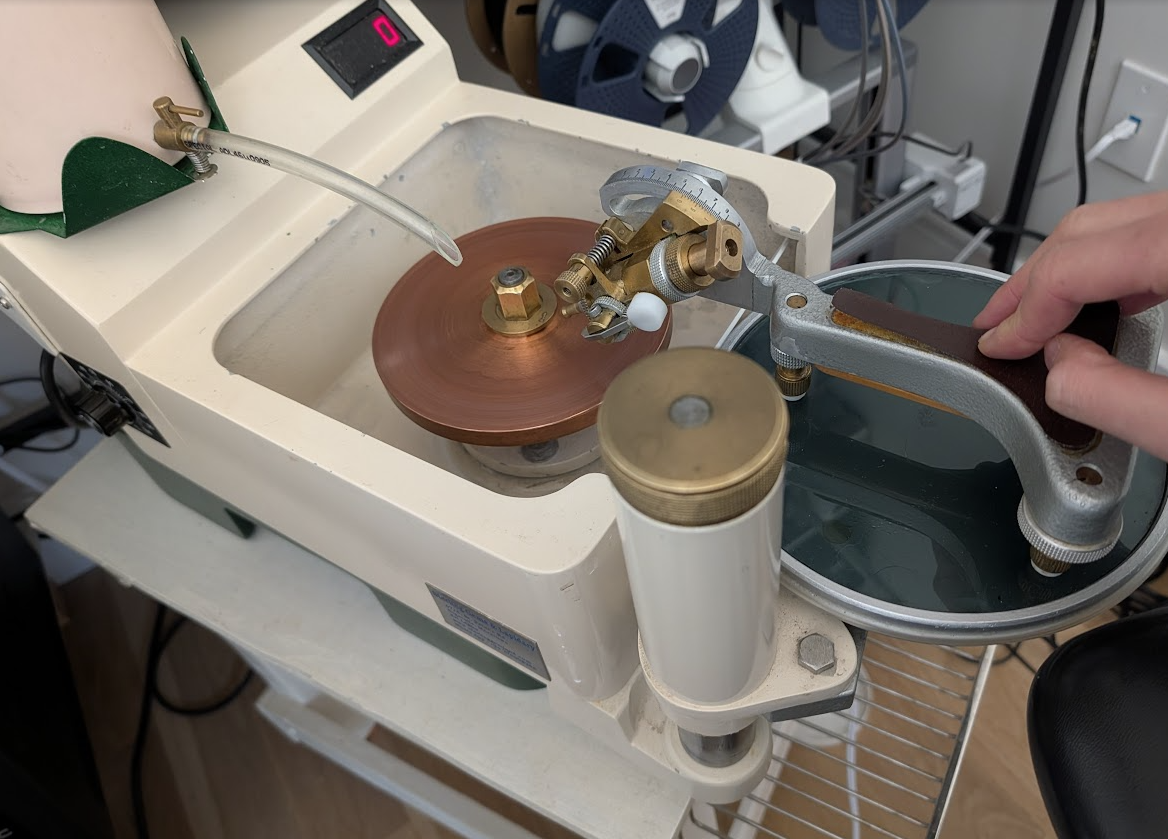
Mine is a "handpiece style" machine where the user holds a handpiece – a three-legged device with a protractor and indexing wheel and holds the stone in fixed position – to apply the stone to various grinding laps. The handpiece sits on a platform that is square to the rotating lap and is attached to a big screw drive and the operator turns the big screw to raise/lower the platform, which in turn affects the position of the handpiece and stone. Put all these movements together and you can hold a stone at a steady angle and rotation against the flat grinding lap (the big copper wheel in the photo) to do your cutting. The machine has a motor driving the spindle via belt, and has a way to drip and drain water onto the stone that is used during cutting. All the parts had been carefully tweaked during calibration to cancel out the multitude of errors exist in all the parts to make sure that the stone is presented square to the lap plate.
It's a relatively low-tech machine compared to American "mast-style" machines that cost about 3x more but have fancy things like digital readouts for angle and height. Those machines are much more rigid so it's harder to put too much force and subtly change the angles on a facet. I have to rely a lot more on paying attention with my eyes, hands, and ears to control how much I'm cutting relative to a fancier machine that have readouts that show depth changes to fractions of a millimeter and angles to a tenth of a degree. But with a bit of practice, time, and a lot of attention, I can get quite precise results. Enough that I don't feel the need to upgrade.
Working from rough material
So the first thing to do with synthetic material is to chop a workable chunk off the raw boule it comes in. Boules often come in solid chunks, all of which can be polished to a shine. Since this material is pretty inexpensive (you can buy it by the kilogram at okay prices depending on color, other types can get expensive), you can afford to be a bit sloppy and wasteful. I mount a lapidary saw to the machine and used a jury-rigged vise screwed to a piece of wood as a kind of cutting handpiece.
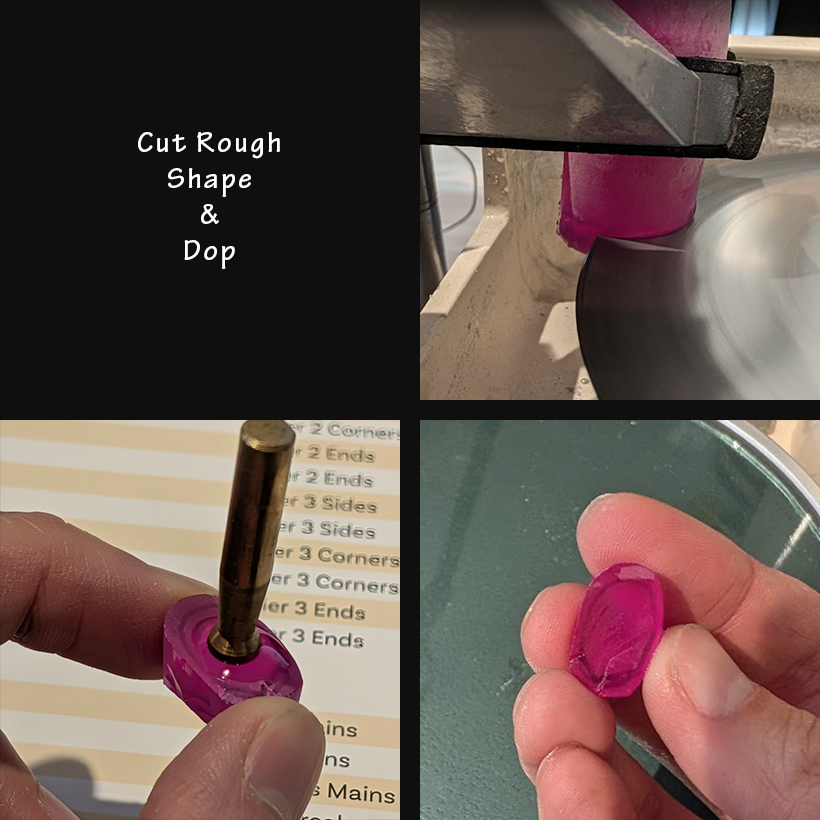
Once the chunk is sliced off, I quickly rough in a flat spot and grind off a bunch of unneeded waste material while leaving plenty of extra room for more precise sizing later. Then the whole thing is glued to a brass stick called a "dop" using superglue. the glue (when used generously) is strong enough to hold the stone in place without dropping the stone and can be removed quickly with heat and acetone later.
We then can start actual cutting, which is really just grinding using diamond laps.
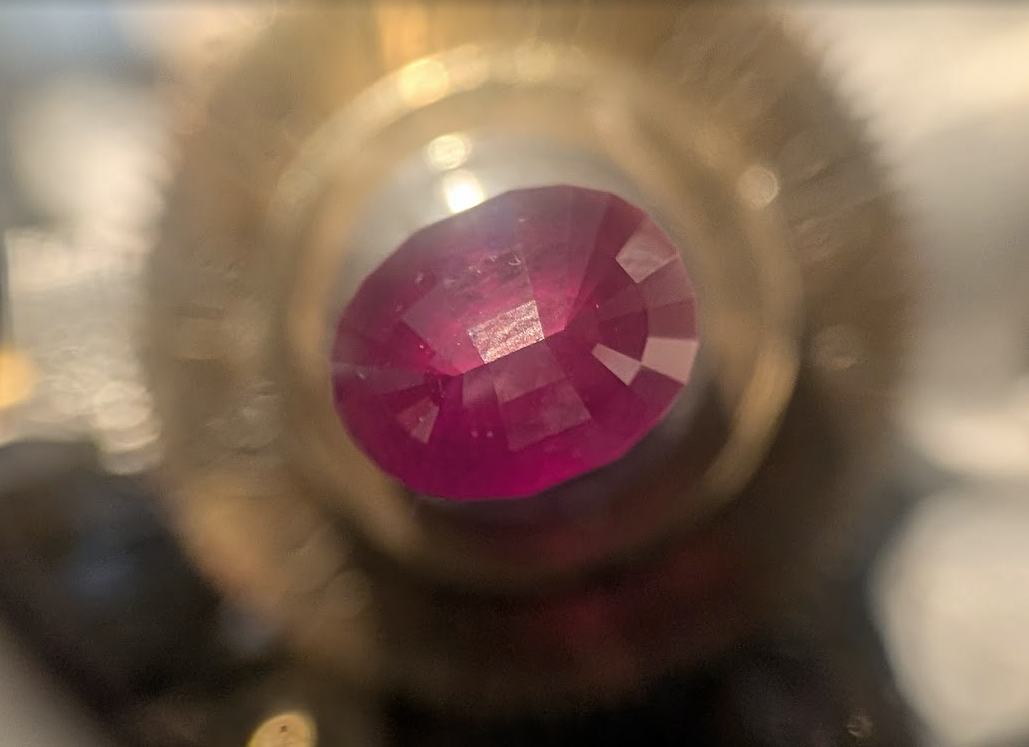
Cutting the Pavilion
So a gem has two main sides to it – the "pavilion" and the "crown". Though traditions differ, most people cut from the pavilion side first.
The pavilion is what most of us call the underside of the gem, it's the roughly cone-shaped side and is specifically designed to do one job very well – reflect light back to the viewer in interesting ways. The angles of the cut are actually adjusted to suit the refractive index of the material so that we get a lot of internal reflections that bounce two, three, or even more times before going back to the viewer. Stones that don't do this well and let light pass nearly straight through are said to exhibit "windowing" because you can see the other side. Stones with too much windowing look dead and lifeless instead of sparkly. It's actually impossible to avoid all windowing because people tilt and move the stones and you're going to always find viewing angles that leak light out. The point is to find a design that does well on avearge.
Synthetic corundum (which is just aluminum oxide fused with some impurities under high heat) has a decently high refractive index so it tends to make pretty stones. Cubic zirconia is even more refractive, and makes some very sparkly stuff.

But we're not here to make boring cube retroflectors, so gemstones have lots of small facets and tiers to try to give multiple different reflections for a given light source. We achieve these facets by using the mechanical tools on the machine. There's gear that is fixed to the clamp that holds the stone's dop and can rotate the stone and stop at repeatable locations. The gear I most commonly use has 96 teeth on it since that supports a large number of common symmetries. Gears with 80, 120 and other teeth counts are available to cut different designs like pentagons.
The process of cutting is pretty simple. The grinding wheel spins various diamond gritted grinding plates, the stone is set to the correct number on the index wheel, and you apply the stone to the plate until you're at the depth you want to be at. On a fancy machine you can use a digital readout, but I have to rely on hearing the stone make a sound when it touches the plate to know if I'm cutting or not.
Although some people can free-hand make up facet designs as they work, I still don't know enough and usually follow a written design that reminds me which indexes to use and what facets need to 'touch' what other facets. Sometimes I'll toy with software to make my own designs.
Whatever your method, you repeat the process all individual facets, using progressively finer and finer grit plates and the stone starts coming into shape. Eventually you stop using diamond grit steel plates and use solid laps (I have a copper and a tin one) that take fine diamond grit suspended in some kind of carrier paste to polish the facet to a shine. Under a high powered microscope you (well over 10x) can still see subtle scratches and pits, but in practice those flaws are as invisible to the naked eye as bacteria are.
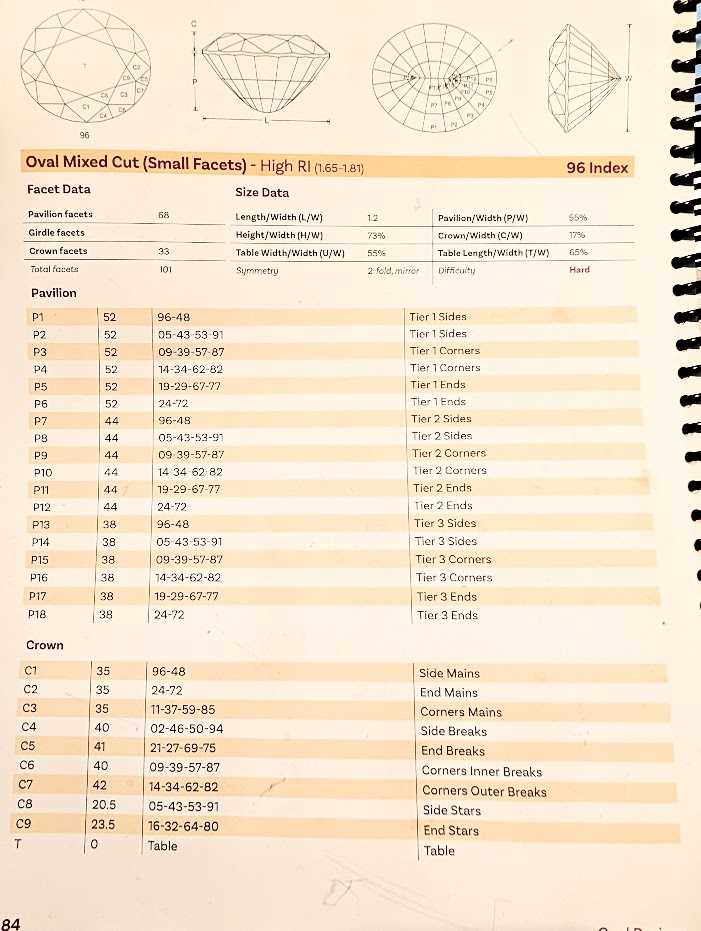
If you study the design diagram above, you might be able to notice that it doesn't tell you how "deep" to make your cuts. Instead, it shows you how facet C2, C3, C5, C7, C9 all come to a single point (See the top left diagram in the photo). Mathematically speaking, there is only one solution where you have a convex hull created from a set of cutting planes with fixed angles that comes to a single point. If you want to make ALL vertices of the gem come to their proper "meet points", there is only 1 set of depths that will satisfy it. Anything else results in one or more deviations where a facet will look too small or too big. This is true down to the tiniest micron of depth you can see or measure.
Getting this right is what takes the most time, especially when you're still learning. The process requires a lot of lifting up the stone to inspect what you're doing through a 10x loupe, because cutting is inherently a subtractive process. If you overshoot your target depth, the only way to truly fix things is to cut all the other facets down and make the entire stone smaller to compensate. Another thing to be wary of tilt and perspective, some facets will appear to meet at one angle, but are still slightly off at another, and you have to be careful.
The human eye is ridiculous
All gem work is typically done under 10x magnification, and while that is quite a bit of magnification, you'd be pretty shocked to know that some extremely subtle details can be picked up by eye even without magnification. For example, take the photo below while I was still working on the pavilion. It's clearly got a "fat" region in the outline towards the top of the photo. If you measure it, it's on the order of maybe 0.1mm difference from the surrounding stone.
The photo was taken under 10x magnification, but if you looked at the stone without magnification, your eyes would instantly tell you something looks "off" about the stone. A bit more inspection and you'd notice that there's an uneven spot.
The same visual acuity also applies to polishing. I don't know how others do it, but I typically put a small spotlight behind me so that when I peer at the facet, it reflects a ray of light back to my eye. At 8000 grit (1-3 microns) polish, any scratches and pits show up clearly as dark areas and spots. Facets polished to 8000 grit can have very subtle wavy lines and ripples in the reflection due to what must be refraction from the surface flaws. I take those waves away using 50,000 grit (~0.5 microns) for the final polish. The whole time, you're working from facet to facet, touching each to the polish until they look correct and hoping you didn't cut too far that it demands you go back to fix things. I've had cracks and pits that were too deep and removing them triggered a re-cut.
Working on the crown
With the pavilion completed, we now have to flip the stone over so that we can work on the other side. This operation is probably one of the more challenging parts of the process because it inevitably introduces all sorts of errors into the process.
When working the pavilion, everything about the stone is aligned because we grind out everything that isn't in the design. A facet lies at angle 52 at index #96 because we put it there. Once that's done, so long as we don't shift the dop within the handpiece, no matter how much we rotate and tilt the stone with the index gear, we can get back to the same facet if we return to angle 52, index #96. But the second we release the dop, we forever lose the indexing location. Fancier machines might have precision keyways or tools to try to preserve this index information for the transfer, but even those systems have some tiny mechanical slop that introduces error.
The stone is put into a metal transfer jig that does its best to align the old top with a new one on the same axis and allow you to slide the two together for gluing. I did my best to keep things aligned but in the end my stone was still tilted roughly 1.5 degrees off, something that would require manual compensation later on. Surprisingly, a very liberal application of superglue will hold the stone well enough despite the high polish of the material. Not enough glue, however, would result in the stone popping off mid-cut that causes tons of issues later since you'd have to re-find your reference points again.
When mounting the stone back onto the handpiece, I have to manually find where my #96 index facet was, mostly by feel and a bunch of small test cuts and visual inspection. It's obviously not perfect but really close, the rest of the differences made up for again by subtle corrections in subsequent cutting and hiding errors in less obvious places.
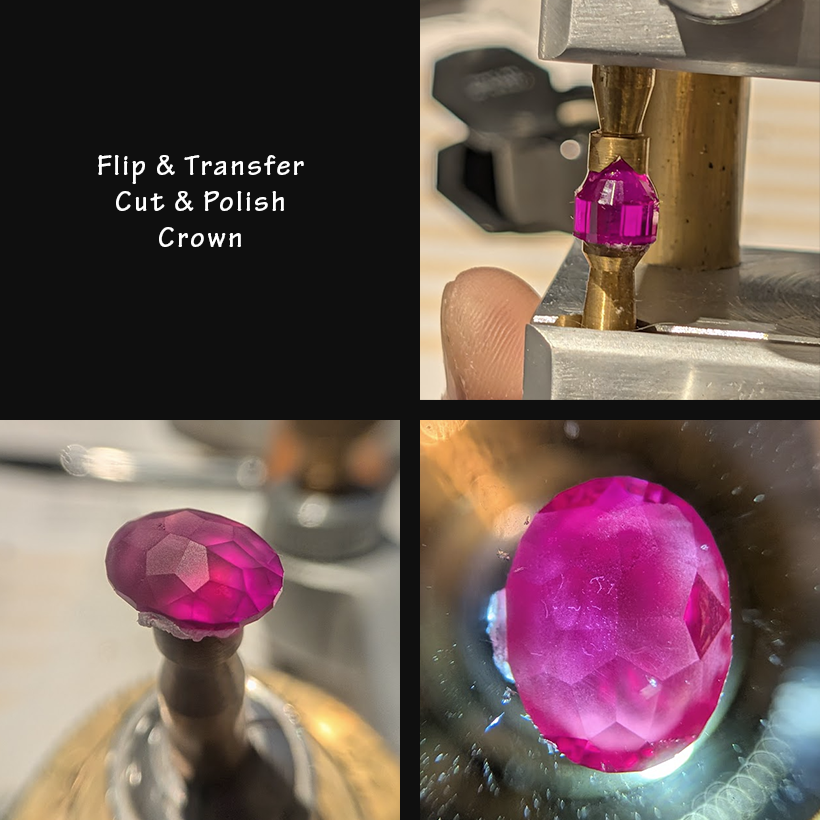
In the photos above you can see the crown cutting, as well as the big difference that appears when a frosty-looking facet ground to ~1200 grit suddenly becomes transparent at 8000 grit. Seeing that transition is one of the most fun and magical parts of the process because the change is extremely dramatic.
Crowns and Error Compensation
The reason why crown facets are typically done later is because they aren't as critical to the light reflecting performance of the stone. The crown's job is to catch light and direct it down into the stone, and also to further break up the returning light for visual appeal. It's less important and not as noticeable if they're very slightly off in terms of alignment and angle relative to everything, and given the very large jump in errors when we have to flip a stone modern cutters tend to prefer this order.
But the main story with working on this particular crown was one of error compensation. While again, the math behind the design mean that you can visually determine the depth you need to cut as result of all the other facets, there's no guarantee that the stone doesn't have a small tilt along any axis. This means every individual facet is potentially unique in its handling. You can't cut to one depth, rotate the stone 180 degrees to do it's mirroring facet on the other side, and expect the same depth to give identical results because the stone might be tilted so that one side is jutting outward more because the transfer wasn't perfect.
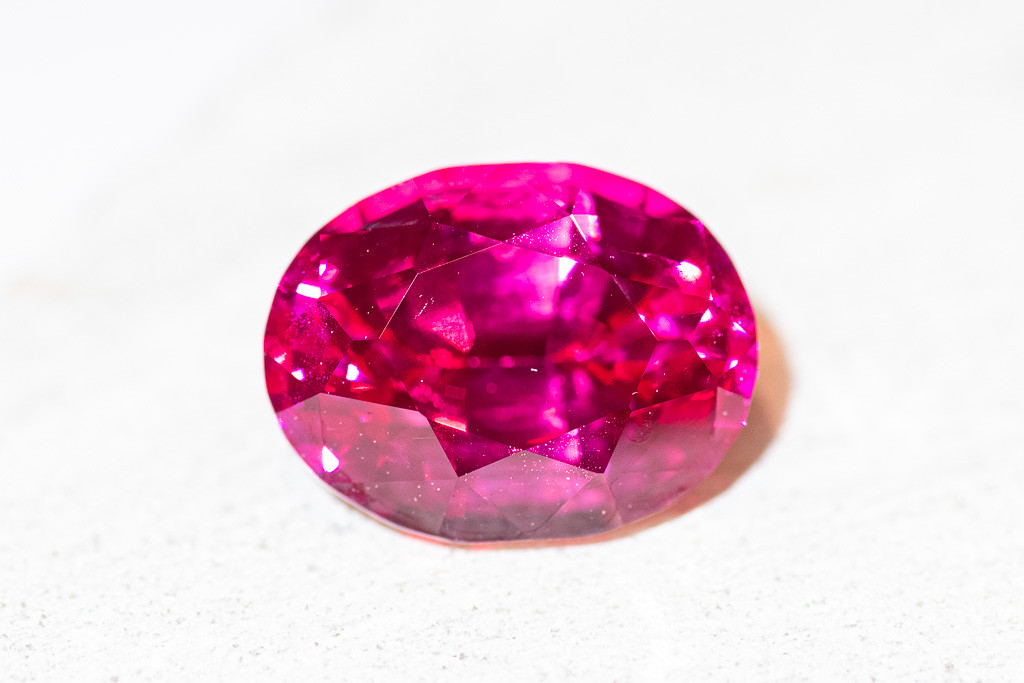
And this is where gem cutting stops being about mathematical precision and becomes about practical concerns. All the accumulated errors and differences within two decimal places of a millimeter are sometimes visible, and the only way to proceed is to find a pleasing balance of all the errors that makes the overall stone look nice, usually by spreading the error across all 360 degrees of the stone. You have to ship "good enough" because chasing perfection will make things worse. I've ground some of my first stones down to almost nothing trying to fix errors and making even more errors. For a gem cutter where they're paid literally by the weight of the resulting stone on a $/carat basis, there are extremely strong incentives to avoid chasing unattainable perfection.
Even the gem I declared finished has a couple of spots that are obviously flawed. You can see one or two vertices that fail to meet due to the stone tilting during transferring I mentioned. There's some subtle outline issues and other tiny nitpicks only I care enough to find. But unless you're very specifically looking for them under magnification, they're invisible. It's still very sparkly and pretty.
Anyways, anyone who has some disposable fun money that's interested in taking up this hobby, feel free to hit me up for details. I don't work on stones very often due to having other things to work on, but when I do I tend to post WIP pictures quite liberally on my socials for fun.
My next silly project involves a motorized spindle. Maybe it'll be ready in a quarter or two.
Useful links for the hobby. No affiliate links, no sponsorship, just places I reference or bought stuff from over the years
- GemologyOnline.com - a forum with lots of good old posts to search through, along with other good info for gem lovers and lapidary arts
- Facetdiagrams.org - free facet diagrams of all sorts! Not just your boring "standard round brilliant"
- Sterling Gems & Lapidary - the folks I bought my machine from
- Ultra-tec - often considered the "Cadillac" of US-based mast faceting machines
- Gearloose - where I got a bunch of polishing laps and other things
- Gem cut studio - the software I'll use to play with designs
- I get most of my synthetic corundum/spinel/cubic zirconia rough off Alibaba
Standing offer: If you created something and would like me to review or share it w/ the data community — just email me by replying to the newsletter emails.
Guest posts: If you’re interested in writing something, a data-related post to either show off work, share an experience, or want help coming up with a topic, please contact me. You don’t need any special credentials or credibility to do so.
"Data People Writing Stuff" webring: Welcomes anyone with a personal site/blog/newsletter/book/etc that is relevant to the data community.
About this newsletter
I’m Randy Au, Quantitative UX researcher, former data analyst, and general-purpose data and tech nerd. Counting Stuff is a weekly newsletter about the less-than-sexy aspects of data science, UX research and tech. With some excursions into other fun topics.
All photos/drawings used are taken/created by Randy unless otherwise credited.
- randyau.com — homepage, contact info, etc.
Supporting the newsletter
All Tuesday posts to Counting Stuff are always free. The newsletter is self hosted. Support from subscribers is what makes everything possible. If you love the content, consider doing any of the following ways to support the newsletter:
- Consider a paid subscription – the self-hosted server/email infra is 100% funded via subscriptions, get access to the subscriber's area in the top nav of the site too
- Send a one time tip (feel free to change the amount)
- Share posts you like with other people!
- Join the Approaching Significance Discord — where data folk hang out and can talk a bit about data, and a bit about everything else. Randy moderates the discord. We keep a chill vibe.
- Get merch! If shirts and stickers are more your style — There’s a survivorship bias shirt!